
Friday, November 25, 2011
I love this stamp! It's from a retired set called Tart & Tangy. I thought the apple was perfect for teacher cards. I visited splitcoaststampers.com, which is a great site for card ideas, if you haven't visited, and found several card samples using this stamp. This was the chosen one. Cards for Emily's teacher for Christmas are not complete.

Thursday, November 24, 2011
Well, I've been creating a little bit but not much. I feel like I've lost some of my mojo and need to work to get it back. I made these cards for a friend who had a baby in March. Yes, I know I'm a little behind but better late than never, right?
I had the bag monogramed and wanted to come up with a card that matched. I was really excited to find the blue in the bag matched one of the new 2011-2013 In Colors by Stampin' UP! Pool Party, Crumb Cake, Chocolate Chip and Cherry Cobbler came together to make a fantastic card! I'm very pleased with how they turned out.

Friday, July 22, 2011
I saw this post with these adorable daisies from the Stampin' UP! bigshot die and I totally had to make one.
This is my creation:

This is my creation:

Thursday, July 21, 2011
Here are the rest of the cards from our crafting day with Gramma Lori (hehehe! love the sound of that!).
This was Erin's card- very fancy!

One of Lori's cards. Great card for babies and the stamp is one of the Stampin' UP! a la carte stamps. It's only $7.95 and think of all the cute cards and gifts you could make with this!

Lori's other card. So adorable! I love the Hello, Doily background stamp. I'm glad that Erin is buying it so I can borrow it from her ;)

Wednesday, July 20, 2011
CUTENESS ALERT!!!!!
Erin brought a 3-D project for us to work on- a backpack! How cute is that?! I normally don't like 3-D because I can never make them look right but this one was a snap!!! We followed the pattern but Erin ended up making some small changes along the way. I think it turned out super cute! We were thinking this would be a great teacher gift for the first week of school- just to thank your kid's teacher for a great week! What do you think?

Great size also for a gift card

The pocket on the front is the exact size of a Ghirardelli chocolate square- how convenient!

Monday, July 18, 2011
Last week, we went to my "Grandma" upline (that sounds so awful because she does not remind me of a grandma!). Whenever we go, she has tons of great stuff for us. This time we all brought stuff to make instead of making her do all the projects. When we got there, she still had a big bag of cards for us- she really spoils us!!!!
I CASED this from the IBC on page 188. The card holder patter on the SU website made the card holder an odd shape- it didn't hold a regular size card. I had to do a little figuring to make it fit but then the envelopes are a tad bigger than the cards so they didn't fit perfectly and anyone who knows me knows I like it perfect. I will play with it more.


I CASED this from the IBC on page 188. The card holder patter on the SU website made the card holder an odd shape- it didn't hold a regular size card. I had to do a little figuring to make it fit but then the envelopes are a tad bigger than the cards so they didn't fit perfectly and anyone who knows me knows I like it perfect. I will play with it more.


Sunday, July 17, 2011
Last post, I showed you a 3x3 card that I'd CASED from the 2010-2011 idea book and catalog. Here are a couple more.
I am the punch queen- if Stampin' UP! makes it, chances are I have it!!! Of course, I don't use them near enough ;) So I decided to play with the Bird Builder punch. What an easy way to make a card!!!! Perfect for all those scraps of paper that we all have floating around!


I am the punch queen- if Stampin' UP! makes it, chances are I have it!!! Of course, I don't use them near enough ;) So I decided to play with the Bird Builder punch. What an easy way to make a card!!!! Perfect for all those scraps of paper that we all have floating around!


Wednesday, July 13, 2011
Bev, Erin and I got together to make 3x3 thank you cards for our customers. This is the first one I made. I was going to enter this is Gretchen Barron's Inspiration In Action CASE Contest but today I realized that I cased this from last year's Stampin' UP! Idea Book and Catalog (pg. 194).


Wednesday, July 6, 2011
Inspiration In Action CASE Contest
This is my card for Gretchen Barron's Inspiration in Action CASE Contest. I can't even begin to figure out how to include a pic of the card I CASE'd but it's the Congrats card on page 13 of the new Stampin' UP! Idea Book and Catalog.
I changed the card to incorporate the new Flirtatious Specialty Paper (pg. 183 of 2011-2012 Idea Book and Catalog) and some Springy/Summery colors. The card base is made with Wisteria Wonder, 2011-2013 In Color card stock.

Visit Gretchen's blog to enter contest, see "official" rules and samples of what others have done.
Thursday, June 30, 2011
Bev was looking for a card to case using the Beyond the Garden Designer Series Paper from the Stampin' UP! Summer Mini Catalog (Mini Catty is on the bottom of the page- paper is on pg. 23). And while you're checking the paper out, look at the stamp set (same page) and Flower Garden Impressions Embossing Folder (pg. 24) that coordinates with the paper!
Anyway... Bev found this card and I decided to case (copy and stamp everything) with different paper. Here are my creations:


Anyway... Bev found this card and I decided to case (copy and stamp everything) with different paper. Here are my creations:


Wednesday, June 29, 2011


Wednesday, June 22, 2011

Monday, June 20, 2011
Flag Day :D
HAPPY BIRTHDAY LINDY!!!
My bff's birthday is on Flag Day. For those of you who aren't aware of this most famous holiday, it's June 14. This year, I actually had my gift early but as usual, left the card making until the last minute. Since I had just made a gift card holder a few weeks ago, I used those measurements to make this holder.
Gift card holder on the left, card on the right.


I actually made a birthday card that I like! I will definitely make this card again!
Sunday, June 19, 2011
More Masking
I actually came up with my own card layout and design!!! First time for everything! So I loved the masking look and knew I wanted to use the Pocket Silhouettes stamp set. Next, I just had to pick out the color combination and here it is. Cute, huh? I see more masking cards in the future!


Monday, June 6, 2011
Techniques
My upline Bev came over on Friday and brought some awesome stuff for us to do. Well, for me to do anyway. Erin couldn't make it so Bev and I made all the samples. I'm so excited about all of the cards we made!!!!
Bev is doing a technique class with her stamper club. Each month, she shows them a new stamping technique and they make a card with it. For us, she is making a card plus just the technique and a piece of paper with instructions. I have other technique pages completed and plan to put them in a 6x6 scrapbook. She does a 6x6 sheet with the technique sample and directions on one side than slides the card on the back side.
The first technique is called masking. There are a lot of different ways you can do masking as I learned when searching blogs for examples. I had so much fun doing these sample and cards, I just kept going! It was so easy and look at how beautiful!!!!!
For this technique you will need:

I used the Lovely As a Tree stamp set, old olive, bashful blue and so saffron inks, and chocolate chip marker. After adhering the index card pieces to the card front, I inked up the tree stamp with old olive and colored in parts of the tree trunk with the chocolate chip marker. Next, I stamped the tree in between the index card pieces once, moved the stamp up and stamped again without re-inking. I did this a second time, moving the stamp up each time I stamped. Last, I sponged bashful blue for the sky, so saffron for the sun and a lot of old olive to fill in the trees so it looks like a forest. Bev's sample is the bottom right card. My card is the bottom left and the 2 technique samples are the ones on the top. I can't wait to try this out with some of my stamps!!!
The next technique is kissing- and not the puckering up kind ;)
For this technique you will need the following:

Here I used 2 stamps: Ornate Blossom and Bella Toile with Daffodil Delight and Pumpkin Pie ink. After inking up the 2 stamps, I stamped the Bella Toile on the Ornate Blossom stamp and then stamped on card stock. The Bella Toile shows up nicely in the Ornate Blossom doesn't it?
These last 2 cards are just because Bev makes us cards all the time. These are made with items in the Summer Mini Catalog from Stampin' UP!

Supplies for this card are Beyond the Garden DSP (catalog picture does not do this paper justice. It is beautiful!!!) and Fabulous Florets stamp set.

This card is made with the Sail Away stamp.
Thanks for looking! I hope I inspired some creativity in all of you!
Bev is doing a technique class with her stamper club. Each month, she shows them a new stamping technique and they make a card with it. For us, she is making a card plus just the technique and a piece of paper with instructions. I have other technique pages completed and plan to put them in a 6x6 scrapbook. She does a 6x6 sheet with the technique sample and directions on one side than slides the card on the back side.
The first technique is called masking. There are a lot of different ways you can do masking as I learned when searching blogs for examples. I had so much fun doing these sample and cards, I just kept going! It was so easy and look at how beautiful!!!!!
For this technique you will need:
- 5x7 index card cut in half
- sponges
- stamp
- ink
- dotto

I used the Lovely As a Tree stamp set, old olive, bashful blue and so saffron inks, and chocolate chip marker. After adhering the index card pieces to the card front, I inked up the tree stamp with old olive and colored in parts of the tree trunk with the chocolate chip marker. Next, I stamped the tree in between the index card pieces once, moved the stamp up and stamped again without re-inking. I did this a second time, moving the stamp up each time I stamped. Last, I sponged bashful blue for the sky, so saffron for the sun and a lot of old olive to fill in the trees so it looks like a forest. Bev's sample is the bottom right card. My card is the bottom left and the 2 technique samples are the ones on the top. I can't wait to try this out with some of my stamps!!!
The next technique is kissing- and not the puckering up kind ;)
For this technique you will need the following:
- a patterned stamp (any small pattern)
- a bold, solid stamp
- 2 different color stamp pads: one dark and one light

Here I used 2 stamps: Ornate Blossom and Bella Toile with Daffodil Delight and Pumpkin Pie ink. After inking up the 2 stamps, I stamped the Bella Toile on the Ornate Blossom stamp and then stamped on card stock. The Bella Toile shows up nicely in the Ornate Blossom doesn't it?
These last 2 cards are just because Bev makes us cards all the time. These are made with items in the Summer Mini Catalog from Stampin' UP!

Supplies for this card are Beyond the Garden DSP (catalog picture does not do this paper justice. It is beautiful!!!) and Fabulous Florets stamp set.

This card is made with the Sail Away stamp.
Thanks for looking! I hope I inspired some creativity in all of you!
Sunday, June 5, 2011
Gift Card Holder
I needed some quick cards for a birthday party today. I Googled gift card holders and I found one here. The first one I tried to make I messed up. Instead of having a 4 x 8 1/2 inch piece of card stock, I had a 4 x 11 piece- ooops! I made one really quick but decided I needed to make it bigger because I had bought Visa gift cards and they were in a cardboard holder and I wanted to put it all in a card. I came up with 6 x 11", scored at 3 3/4 and 8. Worked beautifully. Here they are:


Friday, May 27, 2011
Well, it's that time of year again- the end of the school year and the pressure of getting teacher gifts. I know, there shouldn't be pressure. I know the end is coming, same time every year, but somehow I always seem to leave it until the last possible minute. As a matter of fact, Emily's last day was Monday with the all school picnic on Wednesday and I went with no teacher gifts! Fortunately, the daughter of one teacher babysits for us so I can send her gift home with her daughter. Emily is going to some Tuesday Kids Club days this summer with the other 2 teachers so I can deliver those too.
I knew I wanted to do note cards and looked around to see what cards I thought matched each teacher. This is what I ended up with (so far!).
Miss M is a younger girl- in her 20s I think. I wanted something fun so this is the layout I picked:

I did 5 cards of each color and decorated the envelopes too. I love how they turned out!

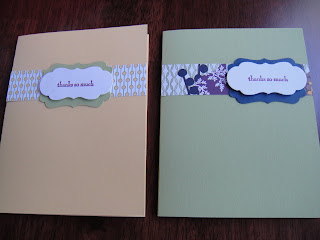
Mrs. M, I don't know, I just picture her as kind of a flowery, traditional kind of girl. I made these cards with a class (didn't do the monogramming though) after I found them on another demonstrator's blog- she used them to showcase the new Stampin' Up! In Colors. I tried several different things on the scallop behind the letter and finally used the Fine Flourish background stamp and created my own DSP (designer series paper). The stamp pattern has light lines and I was able to tie in the In Colors with the monogrammed piece. I love these! I will totally make them again!

Since there are 5 In Colors, she got 2 of each color.

I knew I wanted to do note cards and looked around to see what cards I thought matched each teacher. This is what I ended up with (so far!).
Miss M is a younger girl- in her 20s I think. I wanted something fun so this is the layout I picked:

I did 5 cards of each color and decorated the envelopes too. I love how they turned out!

Mrs. M, I don't know, I just picture her as kind of a flowery, traditional kind of girl. I made these cards with a class (didn't do the monogramming though) after I found them on another demonstrator's blog- she used them to showcase the new Stampin' Up! In Colors. I tried several different things on the scallop behind the letter and finally used the Fine Flourish background stamp and created my own DSP (designer series paper). The stamp pattern has light lines and I was able to tie in the In Colors with the monogrammed piece. I love these! I will totally make them again!

Since there are 5 In Colors, she got 2 of each color.

Thursday, May 26, 2011
So anyone who knows me, probably knows how I feel about treat bags. You know, the bags kids get when going to a party- birthday or whatever- usually filled with candy and little toys. Yea, I hate them.
Emily's "summer birthday" was last Friday at school. Since school was out for the year before her birthday, she got assigned an earlier day to celebrate her summer birthday. She got to be person of the day, line leader, ring the clean up bell and bring in snack. Due to my feelings about treat bags, she was not going to take them.
We went into Meijer to do some grocery shopping and walked right by the flower seed packets. I thought: What a FABULOUS idea! Give all the kids a seed packet, they can plant them and watch them grow. No cheap toys to break and wind up polluting our environment in the dump and no candy to hype them up and rot their teeth. I, of course, couldn't just give the packets to the kids, I had to make them pretty so this is what I came up with:

I embossed a 4x5 sheet of cardstock, inked stamp with markers then punched out. I used the new Blossom Bouquet Triple Layer Punch for the flower behind the Happy Birthday circle. I attached the seed packet to the back with glue dots. I got a lot of positive feedback from people about how much the kids liked them. Yay!!!!
Wednesday, May 11, 2011
New Triple Layer Punch
There are 2 new punches in the new Stampin' Up! mini catalog. I bought this one and it's so cool! If you look on the side of the punch, it shows you where to move the lever to get the shape you want and the flowers next to it are what comes out. Really cute and fun way to dress up anything involving paper and it's SO easy! This one is called the Blossom Bouquet Triple Layer Punch. The other one is the Doily Triple Layer Punch. I just got the Doily in the mail today so I haven't had a chance to play with it yet.

Some little person that I know has a birthday at the end of the month. These are the party invites. Um, CUTE! and so easy!


Some little person that I know has a birthday at the end of the month. These are the party invites. Um, CUTE! and so easy!

Saturday, April 9, 2011

Friday, April 8, 2011
For Easter, we are going with my Aunt and family to a country club that she recently re-joined. Besides Emily (almost 5), Anna (6) and Abby (4) will be there. I made little bags with stuff in them for the girls to play with so they don't get bored and *ahem* disruptive. I made these adorable bag tags to go on them. Aren't they sweet?


The little bags I got for the stuff. I know the owl punch would have been really cute with the bags but since it's Easter Bunny time, I thought I'd do Bunnies.


The little bags I got for the stuff. I know the owl punch would have been really cute with the bags but since it's Easter Bunny time, I thought I'd do Bunnies.

Wednesday, April 6, 2011
I posted on Facebook asking where was the cheapest place to buy cds. I wanted to buy Taylor Swift's Speak Now. A friend said that she had 2 copies from drunk online Christmas shopping and that she would be happy to give me the second one. I made her a set of personalized cards as a thank you.
This is the Thank You card I sent with the package.

I love these In Colors! really I do! And I really like the Level 1 Hostess Designer Series Paper patterns. So cute!!!!

This is the Thank You card I sent with the package.

I love these In Colors! really I do! And I really like the Level 1 Hostess Designer Series Paper patterns. So cute!!!!

Tuesday, April 5, 2011

Monday, April 4, 2011
Woohoo! I'm on a role!!!
I wanted to make some Christmas ornaments for my MOMS Club friends. I looked everywhere for small, clear glass bulbs. I was able to find medium and large ones but no small. While looking at Jo-Ann's, I was directed to a section that had small, clear glass HEART bulbs- so cute! I immediately went home and whipped them up. They are so adorable!
Which one is your favorite? I have to say the blue, green and yellow are mine!


Sunday, April 3, 2011
Well, I'm a little behind on my posts- hehe! uh, yea. These cards are from a class I had in November 2010. The class was with my 2 old faithful friends (no they are not age-wise old- they come to all my classes!) I can't remember who made which cards so I'm just going to post them all!
These were the cards I made for them to copy:

I believe these are Rachel's cards because she always needs thank you cards.

So these would be Danielle's cards:

I'm going to guess Rachel again as she doesn't have this style in her other pic.

Who knows?!

These were the cards I made for them to copy:

I believe these are Rachel's cards because she always needs thank you cards.

So these would be Danielle's cards:

I'm going to guess Rachel again as she doesn't have this style in her other pic.

Who knows?!

Subscribe to:
Posts (Atom)